Saturday, January 19, 2013

Mickey & Minnie Mouse Crochet Beanie!

Mickey Minnie beanies


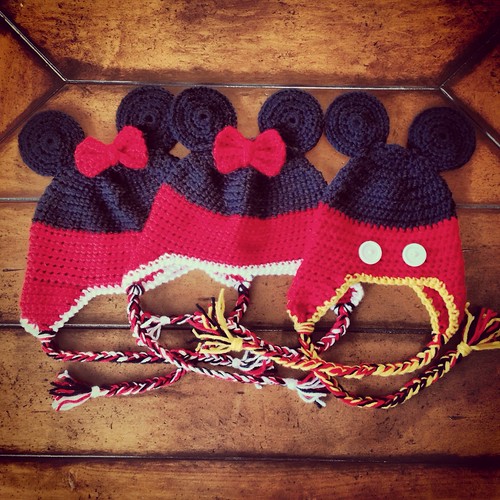
These are three adorable beanies that I made for Christmas gifts!

They are a simple beanie with the additional Mouse details.

I'm not going to go into a full-on tutorial here, but I will outline how I made these.

I started with a basic beanie pattern that you can find all over the Internet.

The one that I love the most was from a Crochet blog named Maggies Crochet (<--click on the name to go to her site). She has a great info-graphic that will help you.

I also used the pattern from damn it Janet, let's crochet! to help me as well. <--Clickable

Here is what I used to make these super adorable beanies:

1 skein Bernat Satin in Snow
1 skein Bernat Satin in Ebony
1 skein Bernat Satin in Crimson
1 skein Caron One Pound in Sunflower (for Mickey)

5.5mm hook

Here are the changes that I made to the patten to help me. Also, keep in mind that my gauge is snug, but not tight.

  • I switched to Red yarn beginning with Round 12.
  • I went to 18 Rounds.
  • The earflap from Janet is the best pattern for an earflap.
Make sure to check your gauge!! If you're getting too tight, then either add another increase row or go up a hook size.

For the ears I followed the basic circle pattern from the info-graphic on Maggies page. For these kids hats I went through round 2.  Make 4 ears per beanie!  Sewing two ears together for one total ear. This makes them double thick and much easier to sew onto the beanie later.

For the bow, I made a little swatch of red hdc's. Then made a little 8-chain 2 row swatch. I used the little swatch for the middle part of the bow and fastened it together. If that doesn't make sense, let me know and I may post a little tutorial on it. It sounds much more complicated than it really is.

Now, the edging. For Minnie I made the edging white since I didn't do any polka-dots for her. For Mickey, I made his edging yellow. I also added two white buttons on the front simulating his pants.

Lastly, attach the ears on the beanies, the bow for Minnie and the buttons for Mickey. Then attach the braids. All done!!

Hope you enjoyed my semi-tutorial on these crazy adorable beanies.

Happy Crafting!!

xo~Tara~xo

Friday, January 11, 2013

T-Shirt Fringe Scarf

Today's craft is a simple and fun one!! T-SHIRT FRINGE SCARF!!

Blue Finished

I've seen a few simple picture tutorials on this one, but no specific instructions. Well, I'm here to fill in that gap for you!

I took two old Mossimo T-Shirts that I had in the closet. These are two that I barely wear anymore, so they are perfect candidates for this project!!

Getting Started 2

First you cut across the width of the T-Shirt just below the armpit area.

Getting Started

White Top Cutting

I then cut off the hem on the bottom of the shirt. On other people's tutorials I saw that they left this on, but I didn't like that, so I cut it off. I think it looks cleaner that way. More fringe-like. <-- That's totally a thing.

Blue in Progress 3

Laying the shirt totally flat on the table, start cutting your fringe. I cut through both layers at once. First round I cut the fringe about 5-6 inches long.

Blue in Progress 2

Then I pulled on the cut lengths to make them fringy. <-- Again, totally a thing.

Blue in Progress
(guest appearance by the Beagle, Norbert, in the background there)
Ends of Blue

After I tried it on, I realized that the fringe was too short. Back to the cutting table. I went deeper on the fringe cut. This time about 10 inches. And pulled them again.

Voila! T-Shirt Fringe Scarf!!

Blue Finished 2


White Top Finished

It's surprisingly warm. And cute!!

I found that the best way to deal with the seam of the shirt (while wearing it as a scarf) it to put one seam behind your head which puts the other one down in front. Don't worry, it doesn't stick out at all. I just made sure to roll the top over towards me, so you don't see the actual sewing part of the seam. That sounds much more difficult than it is, just trust your instincts.

Also, I've posted a little poll to the right over there, asking which day you would like to see me post the craft each week. I personally was shooting for posting each Wednesday (clearly missing the mark with this post...). but what day sounds good to you? Let me know!! 

Happy Crafting!!

xo~Tara~xo

Wednesday, January 2, 2013

Sharpie Coffee Cups!

Sharpie Coffee Mugs.

Cup and Sharpie 1
I've seen this pin a million times, so I decided that this would be a perfect first post for the new blog.

All you need is a white porcelain cup, any color Sharpie that you want, and the design you want!!

There is a ton of inspiration that you can draw from for this project. Not only the cute cups that are posted to Pinterest, but also the cups that you see in stores! If you have the correct color you can virtually make anything that you see!

Planning Stages
Personally, I don't have the drawing skills or patience to make some of the super intricate creations. But I know that there are a ton of you out there with that type of skill. If you got it...use it!!

For my cup I went a little simple. I previously tried this project a while back when I was bored at home one night. I just rounded up a few Sharpies that were laying around in various drawers and scribbled a few things on a cup. It worked, but I made some crucial errors. So here is my documentation of Round 2 with the DIY Sharpie Coffee Cup.

I used a basic white porcelain cup that I bought from Hobby Lobby and Metallic Sharpies.

I drew the molecule for Caffeine on one side.

Cup in Progress 4

And a cool coffee related quote I found on the other side.
               "I never laugh until I've had my coffee." ~ Clark Gable 
       If you know me, you know how applicable this quote is....

Cup in Progress

In the oven at 350 degrees for 30 minutes.

Cup in Oven 1

Overall, I think that the Metallic Sharpies look much better. When I did this project previous, the colors of the markers that I used faded quite a bit. That may have been because they were old or because of the quality of cup that I used. I have no idea.

Finished Cup 3


Finished Cup
Here are some Top Tips for you guys to keep in mind:
  • Let the cup cool off in the oven as the oven cools down. This will let the cup cool down in a nice slow way. You don't want to shock the cup by bringing it out of the oven into a cool temperature too quickly. 
  • Don't rub or touch the Sharpie'd parts at any time until you are absolutely certain the cup is completely cooled off.
  • When writing with the Sharpie how it looks is exactly how it bakes on. Nothing changes. It doesn't blend or spread at all. So if you don't like it, fix it now.
  • I'd recommend a hand wash only if you'd like to keep your cup in perfect looking condition. Some pinners/bloggers have stated that they are perfectly dishwasher safe, but I don't know from personal experience. I will report back on that one.
If you take on this project, let me know! Link me to your finished product in the comments below!

Happy Crafting!
 xo~Tara~xo

Wednesday, December 26, 2012

Welcome!

My name is Tara, and it's time to get Crafty.

I have been sucked into Pinterest. Overcome with pin after pin, producing an overload of crafty projects to turn the mundane scraps from everyday into something more.

Empty Egg Container? I've seen something for that. Extra Pallets? There are boards full of projects for those. Soda Cans? I've got a Windmill you should make!

I've been sucked in. It's taking over.

Now understand, I'm not overly crafty. There, I said it. My moms idea of crafty involves schemes to pay less for everyday items at the store, never to make it herself. It's no fault of hers, she gives into instant gratification more than most. But now that I'm an adult, my crafty angels are shouting down the demons telling me simply to buy it and give in. It's easier sure, but there is an extra level of gratification knowing you made something yourself.

My favorite hobby is Crochet, but that is only where I started. Now I am rapidly expanding into project after project found on Pinterest. You know the pins I'm talking about. The ones that seem so mind-bendingly simple. The ones you can't believe you never thought of them yourself. The ones you suddenly wonder how you ever lived without them. 

So this blog is my exploration of the good, the bad, and the ugly of Pinterest. 

My goal is one craft a week. Even more, I am going to try out more than just crafts. Cleaning hacks, Crock-Pot Recipes, and whatever else tickles my fancy is going to be on display.

Let's get started!!